|
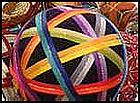
Simple and inexpensive materials are easy to find
and
fun to combine. A Styrofoam® ball forms the core, a layer of batting is applied and
trimmed to the ball, thin yarn is randomly wrapped over, then sewing thread is randomly
wrapped on the outside of the ball. These layers produce a cushioned surface to stitch
into. Preparation of a ball takes only about 20 minutes.
The Secret... A
plain paper strip with no numbers creates all of the patterns! The strip measures the ball
in different directions. Each time, the length is the same because it is a ball. Colored
glass-headed pins mark the North Pole, South Pole and Equator.
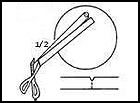
First, the strip is pinned to the ball with the North Pole pin. The
strip measures around the ball, the excess is cut off. Then, it is folded in half - half
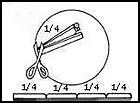
the length of the strip marks the South Pole. Then fold in fourths - a fourth of the
strip's length marks the Equator. Pins are placed around the ball against the 1/4
divisions on the strip. This line of pins creates the Equator. The strip is removed from
the ball and folded into eighths, and 8 pins may be placed, equally spaced, around the
Equator.
Any number of divisions may be made around the Equator - 4, 6,
8, 10, 12, etc. Divisions are also placed between the Poles and the Equator on the mark
lines. These create Cube Sides and Pentagon divisions.
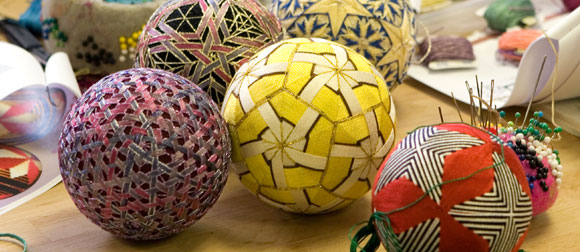
This simple method of measuring gives perfect precision to mark the
patterns of Temari!
Sample Temari Ball
Steps:
Materials:
- foam ball 2-1/2 inches to three inches in
diameter
- polyester fiberfill batting
- fine
weight colored yarn
- sewing thread - medium
spool color to match yarn
- DMC Pearl Cotton #5
in selected colors
- gold or silver metallic
thread
- colored glass-headed pins
- needles:
yarn darners #18, 2-1/4-inch long with large
eye
- paper strips - 1 per ball, cut to measure
3/8-inch wide
(paper cutter and 20 lb. bond
copier paper work best)
Steps:
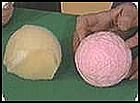
1. Cut two pieces of batting in 3" x 6"
rectangles.
2. Place the rectangles on the foam ball so
that their interlocking fit resembles the two
pieces of a baseball cover that is sewn together.
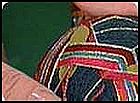
3. Pin the batting in place and trim the
corners of the rectangular pieces (figure
A).
4. Randomly wrap enough colored yarn around the
ball to cover the white color of the batting
(figure A). Remove the pins.
5. Wrap random colors of sewing thread around
the ball to cover the yarn. Stitch the ends of the
thread into the ball.
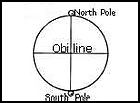
6. Visually divide the ball into North and
South hemispheres (figure B). Measuring is
the key to successfully dividing the ball.
Anywhere on the ball, place a white pin on the
spot where you want the North Pole to be.
7. Use the white pin at the North Pole to
attach the end of a paper strip, folded to a
3/8-inch width, to the ball.
8. Wrap the paper strip around the middle of
the ball so that the strip passes over the South
Pole and ends at the North Pole (figure C).
To obtain an accurate measurement of the
circumference of the ball, repeat this step at
several different longitudes. Stick the pin at the
very tip of the paper, as indicated.
9. When you are satisfied with your
measurement, cut off any excess paper on the
strip, so that both ends meet exactly at the North
Pole when the strip is wrapped around the ball.
10. With one end still attached to the North
Pole, crease the strip in half. In other words,
make a fold in the paper where it passes over the
South Pole.
11. With scissors, place a tiny notch in the
fold (figure D).
12. To find the best location for the South
Pole on your ball, wrap the strip around the ball,
and place a black pin at the notch you made in
step 11. Check the pin placement by wrapping the
strip around the ball at several different
longitudes. Adjust the location of the black pin
as needed. Be patient.
13. To find the Obi Line (i.e., the equator),
fold the paper strip in half, and then halve it
again (figure E).
14. With scissors, place a tiny notch in the
fold.
15. Wrap the strip around the ball again, and
place pins around the ball at the notches you made
in Step 14 to delineate the equator.
16. Insert another white pin at the North Pole.
Remove the first pin and the paper strip.
17. Fold the strip again, but this time in
eighths. To do this, simply fold the strip in half
three consecutive times.
18. With scissors, place a tiny notch in the
fold.
19. Attach one end of the strip to the middle
of the ball under one of the pins at the Equator
(figure F).
20. Wrap the strip around the equator and
attach it to the ball, with the equator pin
opposite your beginning point.
21. Using your paper as your guide, create an
even line around the ball by placing a pin at each
eighth notch on the strip.
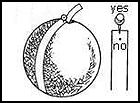
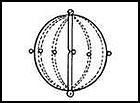
22. Using the pins as alignment and spacing
guides, wrap metallic threads around the ball to
create divisions (figure G). Division
threads are attached to the ball where they
initially attach to the ball and where they end on
the ball. They divide the ball into eight equal
vertical sections resembling those of an orange.
23. Measure four wraps of thread around the
circumference of the ball.
24. Thread your needle, and knot the thread's
end.
25. Enter the needle at the North Pole pin.
26. Using the pins around the equator and the
pin at the South Pole as guides, wrap the string
around the ball four times so that you've created
eight identical divisions around the ball.
27. Stitch the end of the thread into the North
Pole.
28. Tack the North and South Pole intersections
in place after you have created the sections.
29. Sewing an Obi Line around the equator will
keep the eight longitudinal lines in place. Cut a
length of thread that is three times the diameter
of the ball. This is easily measured by wrapping
the thread around the circumference of the ball
three times.
30. Thread your needle, knot the thread's end,
and sew the beginning of the thread into the ball
at one of the pins delineating the equator.
31. Using the equator pins as your guide, wrap
the thread once around the ball in a straight
line.
32. Wrap the thread around the ball in the same
fashion again, but this time, tack down the
longitudinal lines from under the ball's surface
at each place that they intersect the equator.
33. Repeat Step 31 with the remaining thread,
and stitch the end of the thread into the ball at
the point where it was first inserted into the
ball.
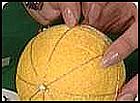
34. Now you are ready to create adesign. One
basic stitch will create most of your design. The
basic stitch can take many shapes, a square, a
zigzag, a triangle or a circle, just by changing
its direction (figure H). Most of the
patterns are variations of the basic stitch.
Because you're sewing on a ball and the surface
threads are random, you can go in any direction.
You are not limited to up-and-down , side-to-side
or flat embroidery stitches (figure I).
35. Use colored pins to divide the lines again
when you establish your pattern stitches.
36. Use a long needle to reach under the ball's
surface. The needle must have a large eye to
accommodate large thread: Pearl Cotton #5 and the
metallic gold or silver thread that creates the
design.
37. Apply layers of thread shapes using
numerical order. Keep track of where you are by
pinning little numbered tabs to the ball. These
will keep you going in the right direction. It's
as easy as following the dots!
38. There are simple tricks that guide threads:
little gates to cross through or paper bridges to
cross under or over (figure J). Only three
basic divisions make all the patterns: 1) the
North Pole/South Pole/equator division, 2) a
division that applies the six square sides of a
cube, and 3) a division that applies pentagons.
With these three divisions and the basic stitch,
thousands of patterns have evolved. After a few
basic lessons, you can begin to create your own
patterns with your own colors. The combinations
are endless.
|